Basically, to send the video to your teacher, you will need to SHARE/EXPORT the iMovie file and upload it to Google Drive and then share that file with your teacher. 1) SHARE from iMovie
Click FILE >> SHARE >> FILE…
Name your file, add a description and click NEXT
Properly name your file and select the location and click SAVE
In the search box at the top, click the Down arrow .
Enter your search criteria. If you want to check that your search worked correctly, see what emails show up by clicking Search.
At the bottom of the search window, click Create filter.
Choose what you’d like the filter to do.
Click Create filter.
Note: When you create a filter to forward messages, only new messages will be affected. Additionally, when someone replies to a message you’ve filtered, the reply will only be filtered if it meets the same search criteria.
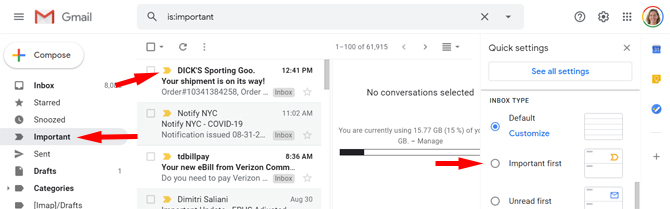
you can choose to organize your inbox so you see “Important first,” “Unread first,” Starred first,” Priority Inbox,” or “Multiple Inboxes.” For “Important emails, Gmail will attempt to flag anything it thinks is important, but you can also step in to unflag messages that aren’t important or flag ones that are. You’ll find that Gmail gets better over time. When you’re in a hurry, you can just look at the “Important” folder.
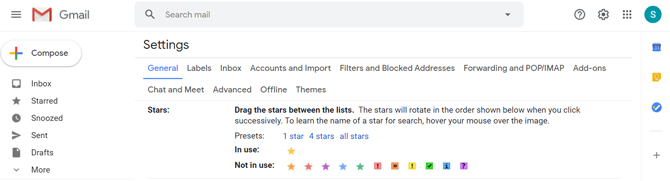
For starred emails, it’s primarily a manual process. As an email comes in, you can star it. The default is a yellow star, but you can enable up to 12 different “stars.” Just go to Settings > See all settings > General and then scroll down to stars. You can drag and drop the ones you want to use from the “Not in use” section into the “In use” section. Just remember to scroll all the way to the bottom to save your changes.
For “Priority Inbox” and “Multiple Inboxes,” you can customize the look to surface emails the way you want. The “Priority Inbox” shows you your “Important,” “Starred,” and “Unread” emails by default, but you can change your selection. For “Multiple Inboxes,” you can choose any of your email folders.
Find exactly what you want with search
Searching in Gmail is just as easy as searching with Google. All you have to do is click the search box at the top of the screen and type whatever you’re looking for.
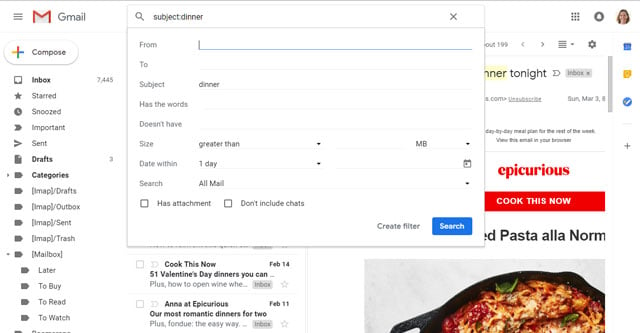
But just like with Google, there are ways you can improve your searches to get the email you want more quickly. A tap on the arrow on the right-hand side of the search box pulls up advanced search options, letting you search on who the email is to or from, as well as words it has or doesn’t have. You can even narrow down the date range, selecting particular dates to search around. (This is also where you create filters that can automatically apply labels to your incoming email.)
If you prefer to type, these search options (and a lot more) can be done with a few keystrokes, too — plus, as we’ve already mentioned, typing can be quicker than clicking. Searching for “from:jack” will pull up emails from Jack. Searching “subject:dinner” will pull up emails with “dinner” in the subject field. Review this list of search operators that work in Gmail to make the most of your searches.
Receive nudges to respond to old email
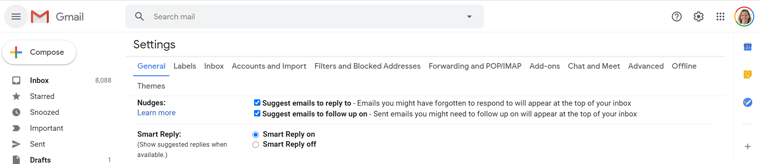
If you sometimes forget to respond to email or follow up on email, turn on Nudges. Gmail will then resurface email that it thinks you may still want to reply to or email that you may want to follow up on. You can turn on and off these two types of nudges separately.
CHECK SPELLING
To check your spelling, navigate to the 3 dots at the bottom right of your email composer and click Check spelling.
Remove unwanted tabs
Gmail automatically comes with Primary, Social, and Promotions tabs already displayed, but you can choose to remove or add different tabs.
Go to Settings > Inbox > Categories to make changes.
http://sugarlab.cds-sf.org/ Sugar is an activity-focused, free/libre open-source software learning platform for children. Collaboration, reflection, and discovery are integrated directly into the user interface. Through Sugar’s clarity of design, children and teachers have the opportunity to use computers on their own terms. Students can reshape, reinvent, and reapply both software and content into powerful learning activities. Sugar’s focus on sharing, criticism, and exploration is grounded in the culture of free software (FLOSS)
http://snap.cds-sf.org/snap.html Snap is a broadly inviting programming language for kids and adults that’s also a platform for serious study of computer science. You can visit UC Berkeley’s instance to get some ideas as well.
You can find Jamboard by going to jamboard.google.com. You can also find it by clicking the “New” button in your Google Drive and hovering over “More”.
Don’t have touchscreens? That’s OK. You can use a mouse or touchpad on a laptop or Chromebook. Or you can download the Jamboard app for Android or iOS (Apple) mobile devices.
When you open Jamboard, you’ll see all of the recent jams you’ve opened. You can click the + button in the bottom right to create a new jam.
Note: This view is the online version from a browser, as seen on a laptop or Chromebook.
1. Draw: Use a pen, marker, highlighter or brush. You can draw from pre-determined colors.
2. Eraser: Erase something you’ve drawn.
3. Select: Choose and adjust a shape, sticky note, image, text box.
4. Sticky note: Add a sticky note with text. You can choose from several colors.
5. Image: Add an image from your device, image search, Google Drive or Photos.
6. Shapes: Add a circle, square, triangle, diamond, rounded rectangle, half circle, bar or arrow. Choose border color and fill color from the menu bar at the top of the jam.
7. Text box: Add a box where you can type and format text.
8. Laser: Use a pointer to emphasize and highlight certain items on the screen when presenting ideas to others.
9. Background: Choose from dots, lines, graph, or dark colors.
10. Clear frame: Wipe everything off your frame with one click. (Undo if it was a mistake!)
11. Frame bar: See all of your frames in one place. Add new frames, duplicate or delete.
12. Menu: From here, you can rename your jam, download it as a PDF, save a frame as an image, remove, or make a copy your jam.
13. Zoom: Zoom in, zoom out, or fit to window.
14. Undo and redo: I’ll bet you know all about this one already.
Note: If you watch videos or read documentation about Jamboard, you might get excited about some features that you can’t access by just using the free app. Integrating Google Meet, adding files from Drive, and some other features only work when you purchase the interactive display. When in doubt, try it out on the app first.
Student collaboration with Jamboard
Jamboard is made for collaboration! You can also share your jams just like you’d share a document or slide presentation. Click the “Share” button and share with individuals and groups or create a shareable link.
Students can interact in jams in lots of ways:
Students can brainstorm and create in small groups face to face on one device.
Share an “everyone can edit” link with students in Google Classroom for whole-class collaboration.
In remote or online settings, students can work together in small groups in the same jam.
In lots of the ideas below, you can add a layer of collaboration by giving students an “anyone can edit” link.
Note: Jamboard does not have a version history. This does remove an element of accountability that encourages students not to abuse the activity, writes Wes Fryer in his Speed of Creativity blog. You know your students, so you may well know whether they’ll abuse this situation or not. I could see using it with small groups more readily than a whole group because the one who acts out is usually trying to perform for a large audience. You can always use Jamboard to display your own ideas and make them viewable later.
20 ideas for using Jamboard in class (+ FREE templates!)
So … what could this look like in class? I’m glad you asked! Here are several ideas for using it with your students. If you like the ideas, then click the “Get this template!” button and make a copy of a template you can use right away with students!
1. Use shapes to highlight.
When you draw a shape on Jamboard, you can set the fill color as transparent. Make the border colors different colors and have each one stand for something (like parts of speech in a sentence). Students can duplicate the boxes and use them to highlight important parts of the content on the frame.
Take a screenshot of a text — a passage from a book, part of an article, etc. Encourage students to annotate it by using the highlighter or dragging frames around important sentences. Then, they justify their responses. Use multiple frames for multiple passages if needed.
Jamboard is great for brainstorming — gathering ideas, sorting them by color, organizing them on different frames, moving them together, drawing lines to connect important ideas, etc. Give students a brainstorming space — and, if it fits, let them collaborate, too!
Images and text about a topic. We’ve done posters forever in the classroom, right? Jamboard gives you access to TONS of images. Plus, students can always collaborate and share on each other’s posters. See, there are some ways to upgrade a classroom classic!
Images and text about a topic. We’ve done posters forever in the classroom, right? Jamboard gives you access to TONS of images. Plus, students can always collaborate and share on each other’s posters. See, there are some ways to upgrade a classroom classic!
A fun part about learning something new is guessing. Can I guess the right answer? Can I figure it out on my own? This circle and guess activity can be engaging — and get students thinking deeply.
Using Jamboard as a teaching whiteboard has lots of benefits. For remote learning, it’s a whiteboard you can share on your screen during a video call. Plus, when used anytime in any setting, you can always share your whiteboard with students to view later — and bring it back up to add to it.
This one’s fun! It has so many possibilities. Students can find images and tell a story. You can add images and have students tell stories about them. Or you can do an add and pass activity, where each student adds a slide with an image and some text to the story.
How do we know what students are thinking when they create with Jamboard? Let’s give them a way to tell us! Have students do screen recordings of their jams with a tool like Screencastify. They can describe what they’ve done, show us how they do it, and tell us why.
10. Graphic organizers
Graphic organizers give students a space to think. They can walk students through a line of thinking. They can help them get their ideas in order. Create graphic organizers in Jamboard and students will be able to draw, write, and move items around. Here are lots of graphic organizers you can download (File > Download > PNG image) to put on a Jamboard frame.
Give students a situation and let them debate the pros and cons. They can do this on their own individual frames in a jam or all together on one big frame in Jamboard.
This is a great study technique for long-term learning! Retrieval practice tells us that a “brain dump,” where we recall everything we can about a topic, is better stored in long-term memory than if we re-read chapters or notes. Provide a space where students can do a brain dump. (Note: Ctrl+Enter lets students complete a sticky note and start typing on another one.)
After doing a brainstorming or listing session, it might be time to put the most important items in order of importance. Students can add text, sticky notes, images, even drawings in the boxes. In the text below, they justify their responses.
Curation is the idea of collecting the best items and then justifying why they fit the collection. Students can easily do this in a jam by adding images, text, sticky notes or even drawings. Then, they can justify why their choices make the top 10 list.
These silly stories can be a lot of fun! They can also give students practice with different parts of speech. On one frame of a jam, have students write out their words. Then, they can cut the sticky notes with the words and paste them on the second page, where you’ve written the story. (Be sure to include hard returns / spaces between lines of text so there’s plenty of room for the sticky notes.)
Everyone gets a frame in this jam. The first thing students do is write their name at the top of their jam. Then, they answer a question or respond to a prompt you give them. When they’re done writing, adding images, drawing, etc., they can go look at each others’ responses. The best prompts for this are those where there isn’t a single correct answer.
Studying a character in a story? In history? In current events? Students can use a jam to gather all the details they can about that character. Or students can gather details on different characters on different frames of a jam. Add images. Add lots of details. Maybe draw a picture of that character!
Deciding which of several items doens’t fit — and, more importantly, WHY it doesn’t fit — can help learning. In this template, students add images or text for four different things. The student drags a red X over the one that doesn’t fit and then describes why.
Sketchnoting — or visual notetaking — blends the verbal (words) with the visual (images). It’s very brain friendly. When students get used to adding images to their notetaking, they’ll find that it’s easier to remember things they’ve learned. Jamboard can be a great spot for visual notetaking, especially if students have a touchscreen device.
When students meet in video call breakout rooms, Jamboard can be a great place for them to take collaborative notes. Have one student create a jam and share it with fellow students. Use the “everyone with the link can edit” sharing setting. Students can then take notes in the same document.
Google Jamboard tips and tricks:
Control D to duplicate. For many items on Jamboard, you can choose duplicate out of a menu. But using the keyboard shortcut (Control D) can save lots of time.
Voice typing. Jamboard doesn’t offer voice typing for those that struggle with using a traditional keyboard. But students can always open a Google Doc and use voice typing out of the Tools menu. Copy and paste the text into Jamboard.
Make jams available to students. Grab a share link to any jam you use to teach students. Put that link somewhere in Google Classroom or a class website so students can access it later. (Adding the link to the description of an assignment connected to that jam streamlines things!)
Make jams into templates you can copy. Want to make templates that you force the user to copy — like I did in this post? Click the “Share” button and change the link to “Anyone with the link can view”. Copy the link. Then, when you paste the link, change the end of it, deleting the word “edit” and everything after it … then typing the word “copy” in its place. That link will force the user to make a copy of your file.
Chrome updates happen pretty frequently and they should be installed to help with functionality issues and to help with security.
HOW TO UPDATE CHROME (on a CDS iPad):
First, quit the Chrome app on your CDS iPad by double-tapping the HOME button and swiping up in the app to quit it.
Then open the SELF SERVICE app and click on REINSTALL under the CHROME app. You may need to tap REINSTALL a couple of times if the first time did nothing.
Wait about a minute for it to install! That’s it!
HOW TO UPDATE CHROME (on Mac/Laptop):
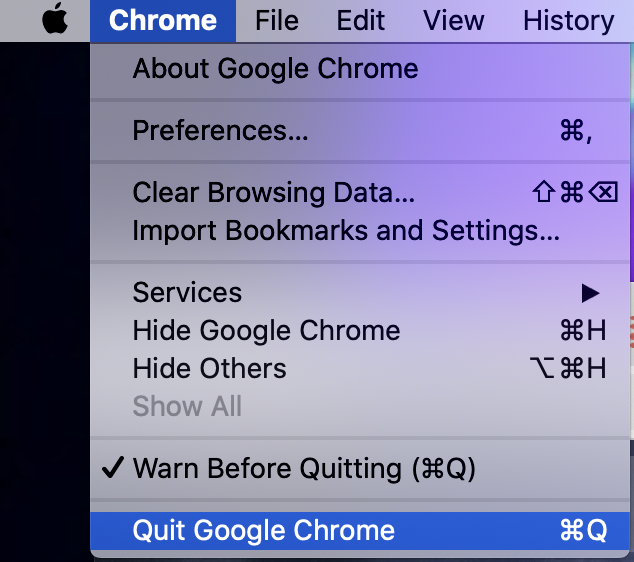
Quit Google Chrome first (FILE > QUIT)
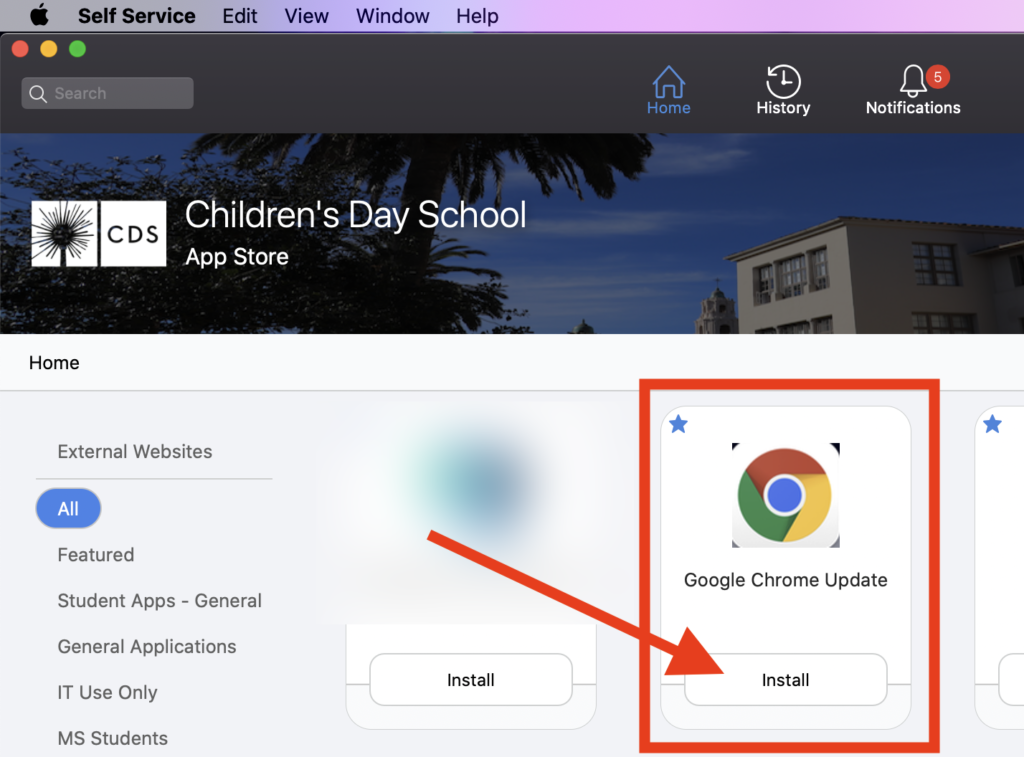
Open the SELF SERVICE app
Look for GOOGLE CHROME and click INSTALL. It should install in less than a minute. The Google Chrome app will disappear from Self Service after it has been installed.
Quit SELF SERVICE.
Open GOOGLE CHROME (the logo will look a little differently)
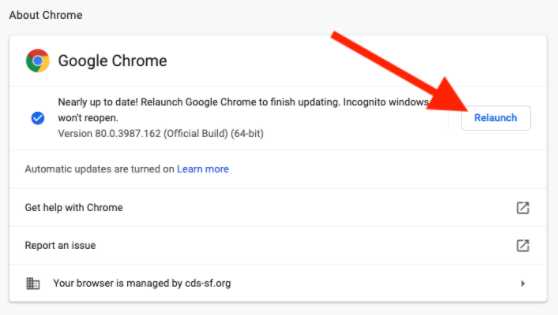
Click CHROME >ABOUT GOOGLE CHROME
It should automatically start to update
Click RELAUNCH if prompted
HOW TO UPDATE CHROME (on Personal/other devices):
If you are using an Apple device, you can go to the App Store and update it from there.
For downloading and installing a fresh copy of Chrome on your personal device, visit Chrome’s download page.
With additional precautions, touchless sign in/out via ProCare (formerly Kinderlime) is available.
DOWNLOAD PROCARE & SIGNIN
Install ProCare (iOS/Android) app on your smartphone If you had the Kinderlime app installed before, if you update the app, it will automatically update it to ProCare.
Login with your account info. If you do not know your password, click RESET password and follow the prompts.
AT SCHOOL: SIGNING YOUR CHILD IN or OUT
In the ProCare app on your smartphone:
On the HOME page, click the QR code symbol above your child’s picture
With your smartphone camera, scan the QR code on the iPad screen
Select the child you are signing in or out and sign on your smartphone.
If your child is prepping for High School and you have signed up for the SSAT test, you will have gotten an email. In the email message, follow the instructions to test your connection and download a new copy of the PSI app.
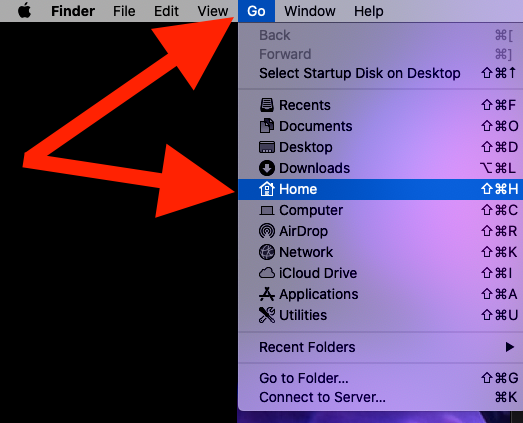
BEFORE INSTALLING: If you are on a CDS Student laptop has an OLDER copy of the PSI app already installed. You will need to DELETE this before installing the new version: • On your Finder/Desktop, click GO > HOME
• Open the Applications folder. • DELETE the PSI Secure Browser app. After the OLD copy is gone, install the new version per the email!
If you need an admin username and password for the CDS middle school student laptop, email .
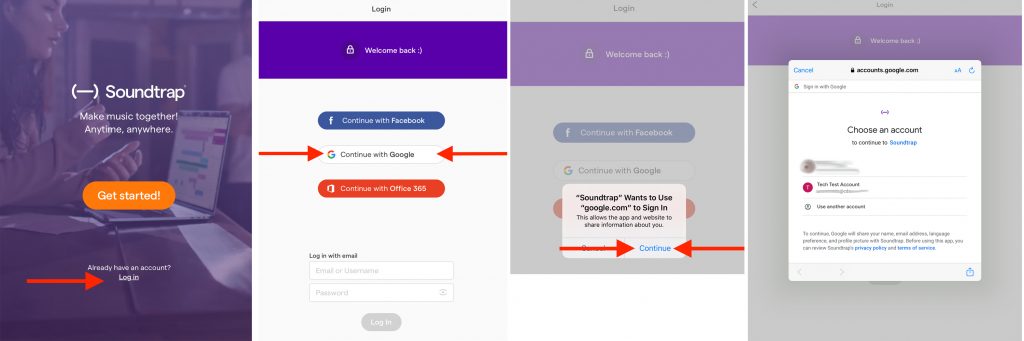
Click CONTINUE WITH GOOGLE If you get the message “Soundtrap wants to use google.com to sign in”, click CONTINUE.
Select your CDS Google Account. You may need to enter your CDS Google password. If you do not know your password, please email the CDS Helpdesk or ask your parents/guardians to email Tech Dept.
Click your CDS account You may need to login with your CDS Gmail account with your email address and password.
VIDEO TUTORIALS
Here is the entire SoundTrap tutorials.
This video is a quick crash course on how to use SoundTrap.
TIPS & TRICKS
Do Not Use the Chat Feature in SoundTrap. Chat can be helpful in small projects but when your entire class and teachers are in 1 project and someone chats…basically you are spamming everyone!
TIPS FOR iPAD
Loading Time: If there are alot of tracks in the project you are opening, it may take longer to load. Projects with more than 10 tracks may take 3-5 minutes to load.
Contributors (people icon) and Loops (♫ icon) in your way? With your finger, slide it to the right to hide it; tap the contributors or loops logos to bring it back
Adding New Track? After you click ADD NEW TRACK, you have lots of options to choose from. Click the instrument type you want.
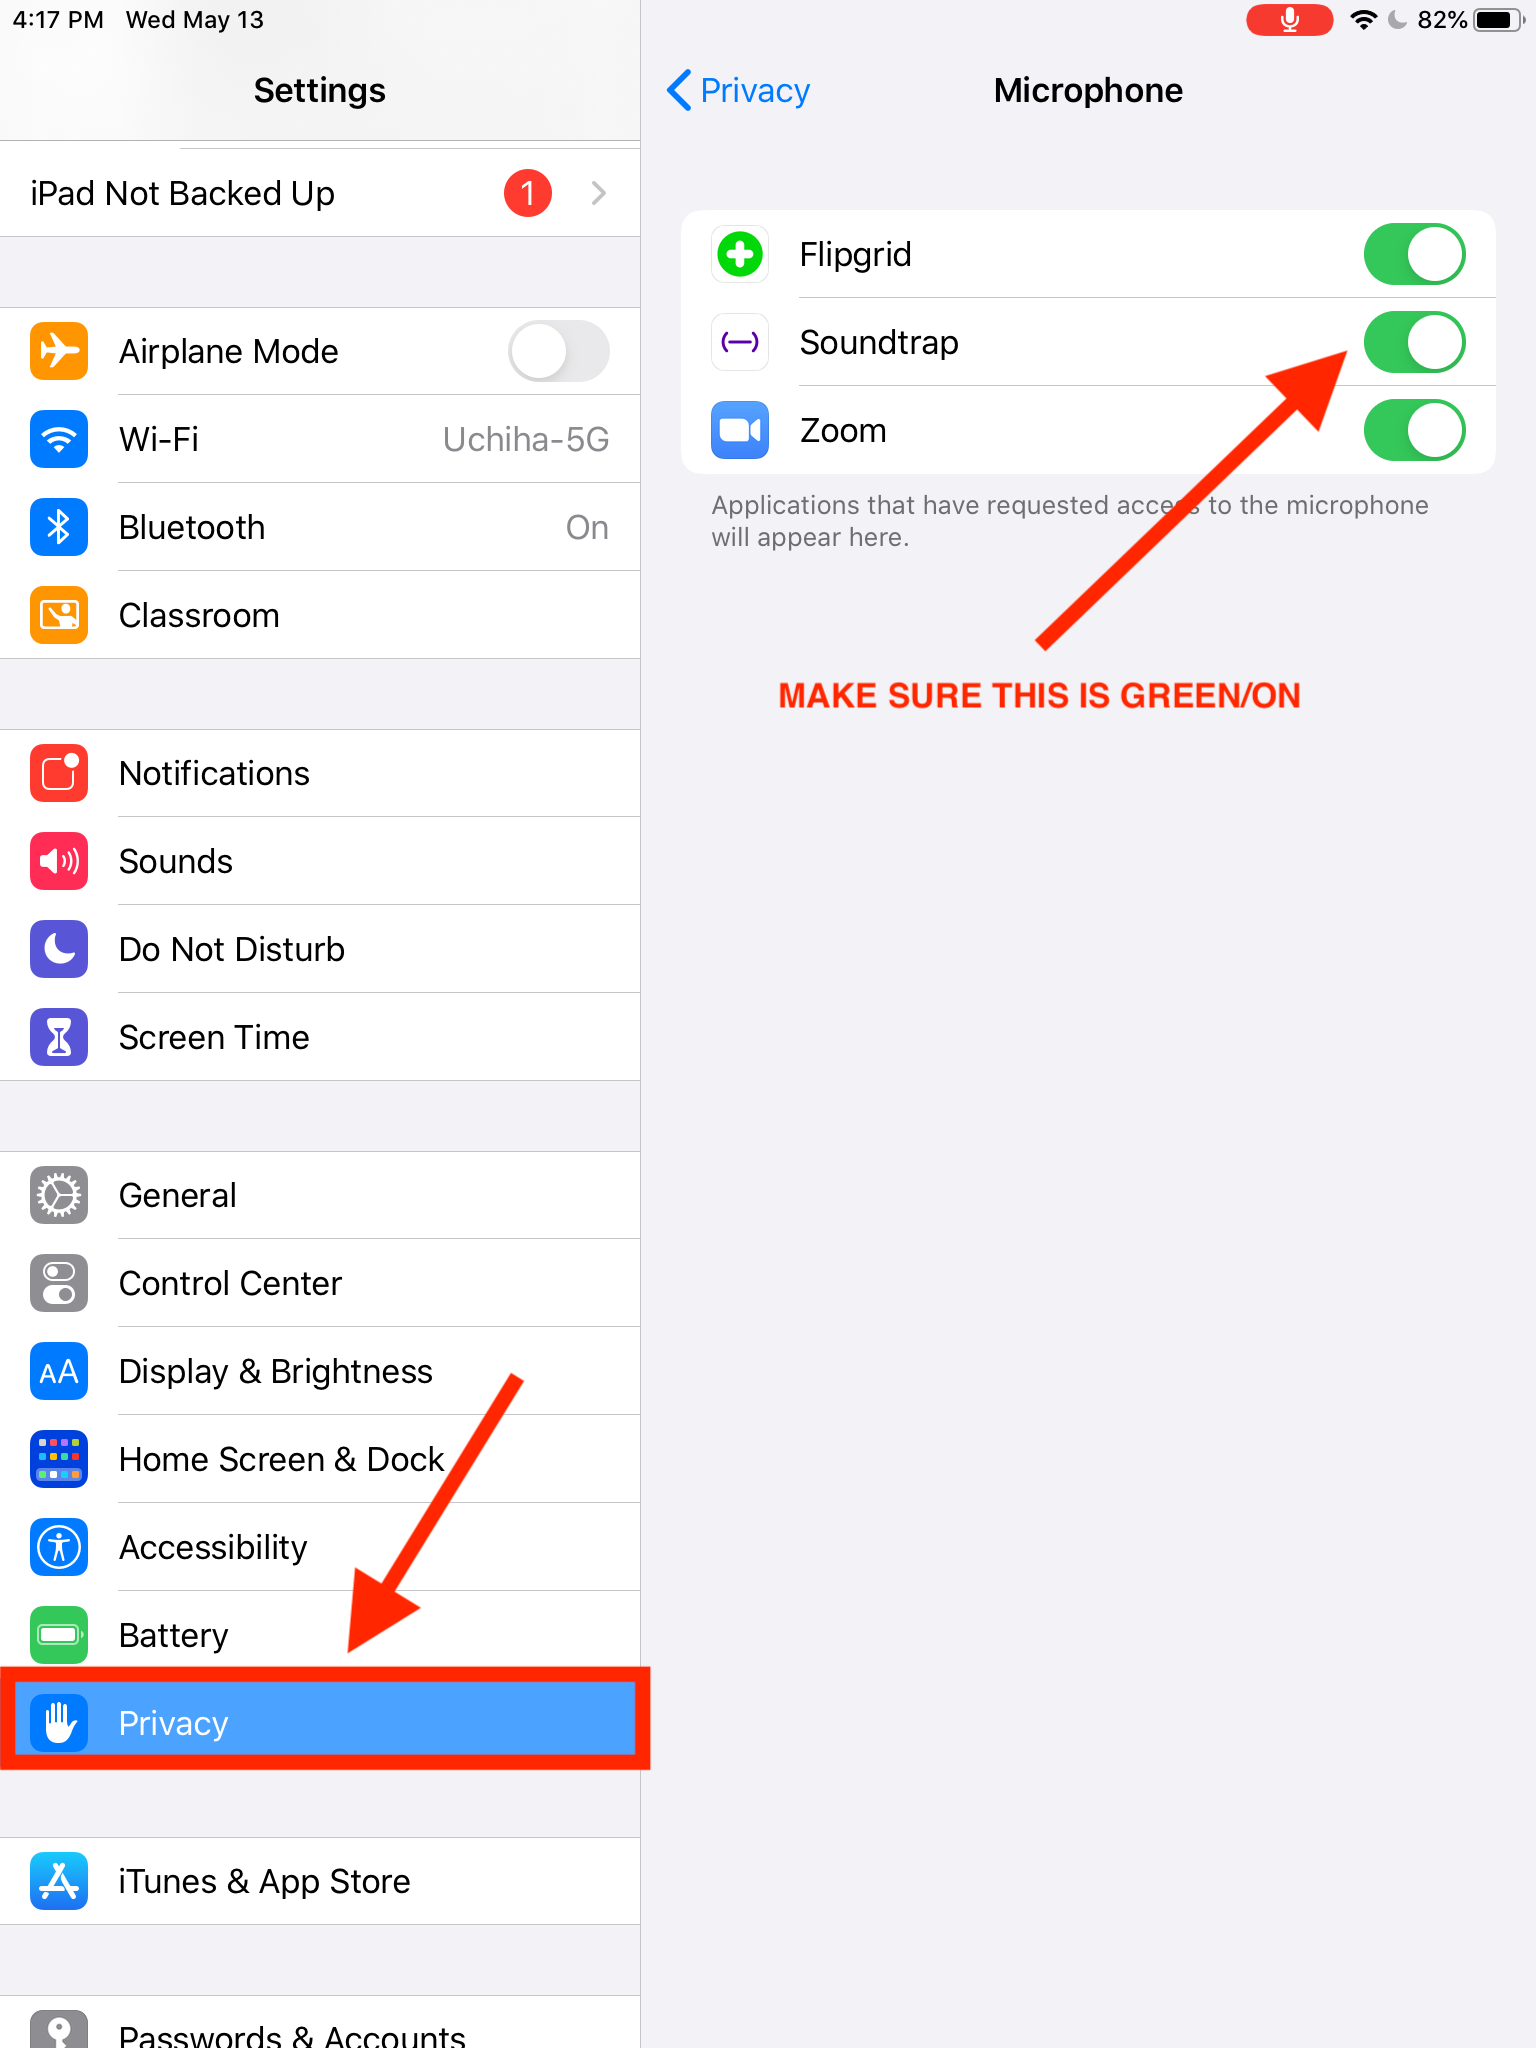
Mic not working? Go to SETTINGS app > PRIVACY > MICROPHONE and make sure SOUNDTRAP is toggled ON.
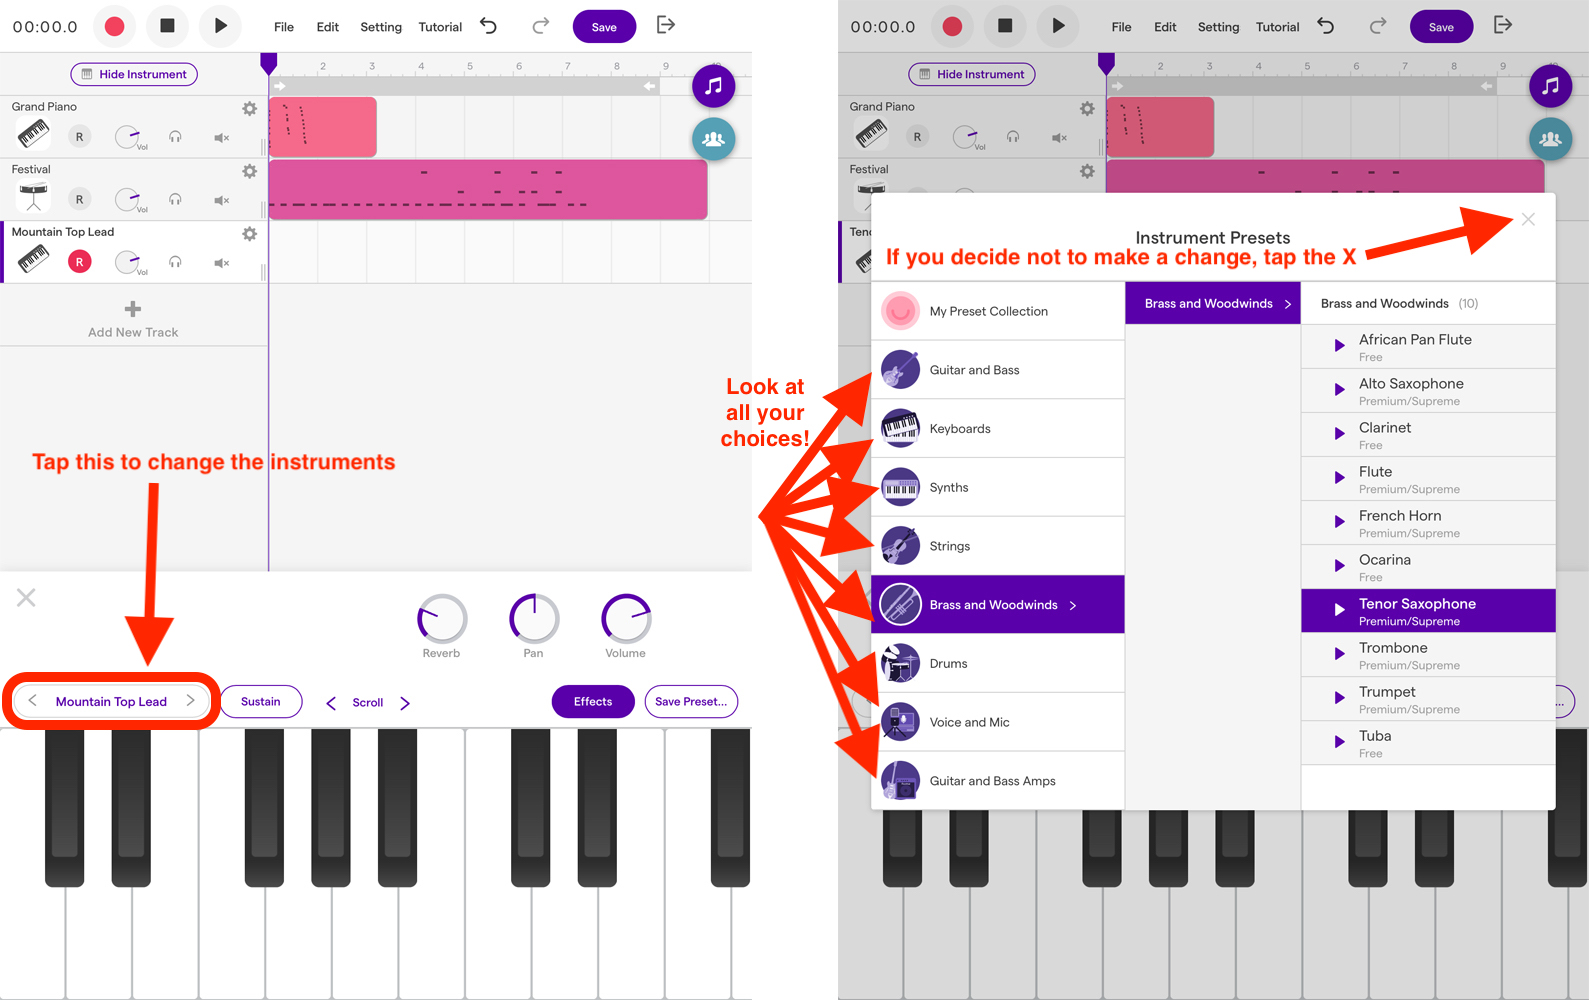
Need to change the instrument for that track? No problem! You can then change it to a different instrument at any time. Tap the name of the instrument (left side above the instrument). Tap the kind of instrument you want and tap the instrument and then it should close this window and change the instrument.
TERMS
WHAT IS THE “STUDIO”? The “Studio” is what you can go in the SoundTrap app to edit or add content to a project.
CONTRIBUTORS Contributors are who the project has been shared with. (Basically, your classmates and teachers.)
LOOPS (♫ icon) Loops are sounds that repeat. Most songs have a constant beat or drum sound in the background.
As a tool for families, CDS has put the Lower School classroom Zoom links in the CDS All School and classroom calendar in ParentSquare.
Families can subscribe to this calendar and put it on your smart phone (android or iPhone), iPad, Google Calendar, or Calendar app on your computer.
HOW TO SUBSCRIBE
From a Computer for Google Calendar:
From a web-browser, log into ParentSquare If you do not know your password, click FORGOT PASSWORD link and follow the prompts to reset your password.
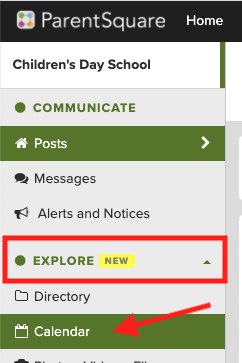
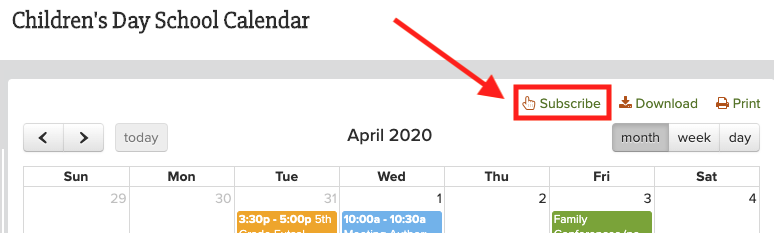
Click EXPLORE on the left
Click CALENDAR
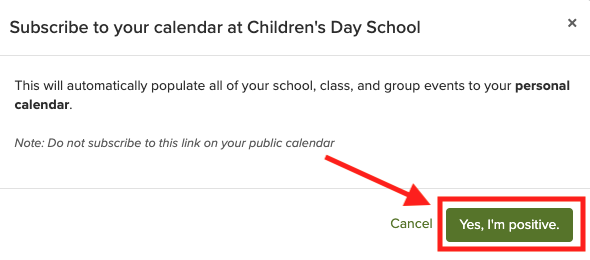
Click SUBSCRIBE.
A message will appear. Click YES, I’M POSITIVE.
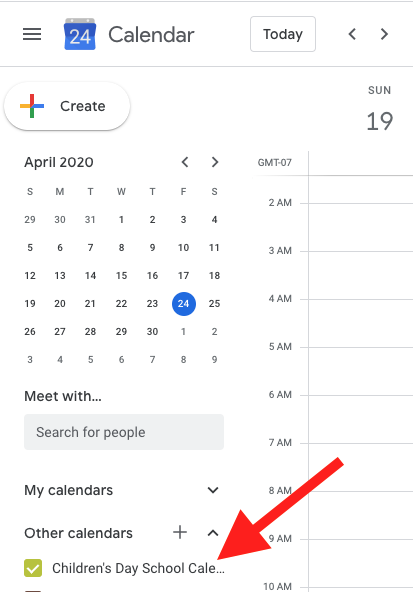
If you are logged into your personal Google account, it will automatically add the Children’s Day School Calendar under OTHER CALENDARS on the left.
From a Smart Device (iPhone/iPad/Android):
From a web-browser on your device, log into ParentSquare If you do not know your password, click FORGOT PASSWORD link and follow the prompts to reset your password.
Click EVENTS at the bottom
Click SUBSCRIBE
Click YES, I’M POSITIVE
Follow the prompts on your smart device to add it to your default/built-in calendar app.
From a computer, for iCal, Yahoo! Calendar, etc:
From a web-browser, log into ParentSquare: https://www.parentsquare.com/schools/446/ If you do not know your password, click FORGOT PASSWORD link and follow the prompts to reset your password.
Click EXPLORE on the left
Click CALENDAR
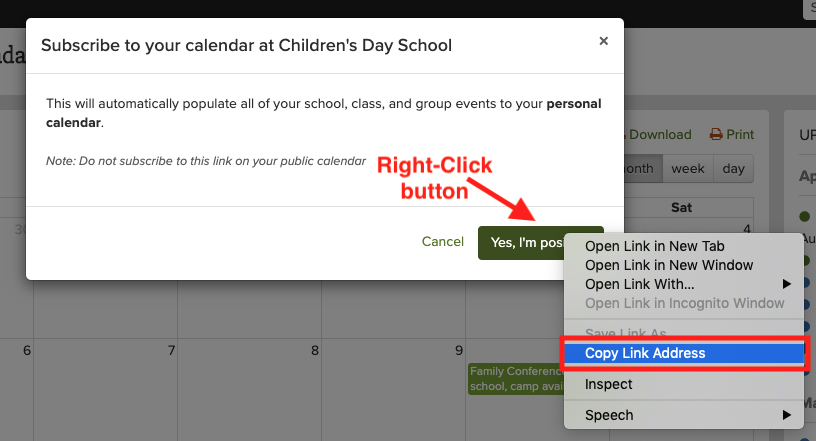
Click SUBSCRIBE.
A message will appear. Right-Click (or ctrl+click) the “Yes, I’m Positive” button.
Now go to your calendar app or site that you want to add the CDS Calendar to.
Navigate to add a calendar subscription.
Paste the link and save.
Other app/site instructions for adding a calendar link subscription:


")
 (1)")
")
")
 (1)")
 (1)")
")
")

 (1)")
")
")
")
 (1)")
")

")
")
 (1)")