Ergonomic Health: What is ergonomics? Ergonomics is an applied science concerned with designing and arranging things people use so that the people and things interact most efficiently and safely.More simply, it is a science on how to keep your body happy and healthy.
We want you to have a happy and healthy body too when you are using your iPad or laptop at home! Here are a few tips for everyone!
Posture: It’s important that they sit up in their chairs with the soles of their feet resting naturally on the ground. A chair with good back support will help support this. The annoyance of sitting up upright will save you years of pain down the line.
Screens: Computer screens should always remain about an arm’s distance away, and should be kept at such a height that your neck strains neither up nor down. A good laptop or tablet stand can help you achieve the right position.
Lighting: Ensure your schoolwork spaces are always amply lit and away from any windows or lamps that can create glare. Maybe reposition the lamp.
Sound: It’s important to limit the volume so that it is no more than 60 percent of the maximum allowed. Alternatively, use child-friendly headphones, which do this limiting automatically.
Need help strategizing with your family about how to keep a healthy balance screen time and everything else available to us?! The links below offer different ways to talk about, monitor, limit and block device functions. These change regularly – and new ones are always in development – so please let us know what you discover works for you!
Canva is a fast, easy way to create posters, postcards, infographics, or anything visual you can imagine! You can start with a template or start from scratch, and Canva is available via an app and web browsers!
INSTALLATION:
On CDS iPads, if not already installed or need to reinstall: • Go to the SELF SERVICE app
• Click INSTALL/REINSTALL for the Canva app You may need to click install a couple of times if it does not install the first time.
On personal/family devices and laptops,go to one of the following links:
CHROME BROWSER: If you are using Google Chrome, make sure Google Chrome is up-to-date. On an Apple computer, click CHROME in the menu bar and select ABOUT CHROME. It should automatically check for updates and update. You may need to restart your Chrome browser once it updates.
OTHER BROWSERS: Khan Academy is specifically designed to work with the Google Chrome browser. Most things should work in other browsers like Firefox, Internet Explorer, Safari, etc. but if something does not work, try it in Google Chrome.
KHAN ACADEMY APP on iOS (iPad) Khan Academy is designed to work in the Chrome web browser on a computer and not all items in Khan Academy will load on an iPad. Make sure the app is up-to-date and most lessons should work on your iPad that your teacher assigns. You can update the Khan Academy app with the directions at the top of this page.
You may want to try using the Chrome browser on your iPad to see if it will load as well.
An app and website where students and families access electronic reading and listening. CDS has access to an Overdrive library shared with various independent schools in the Bay Area.
What about San Francisco Public Library content?
Access SFPL’s Overdrive content using the Sora or Libby apps thanks to a partnership through SFPL Scholar Card
Can’t I just use Libby for SFPL content?
You can! However, we highly recommend you access SFPL’s library through Sora
Sora automatically sets access levels for juvenile (ECP – 6th grade) and young adult (7-8 grade) content, making it easier to browse books at your level of interest
It also means you don’t have to switch between apps to view SFPL’s collection
It’s a kid-friendly version of Libby, with achievement badges gained the more you read
LOGGING IN:
A tutorial video of the instructions below is available here.
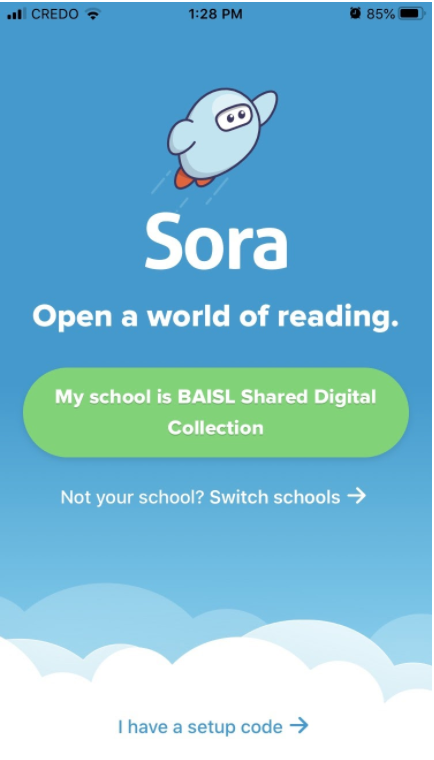
1. Click Sora app. If using a web browser sign in using this link & skip to step 4.
2. Select the green button: My school is BAISL Shared Digital Collection
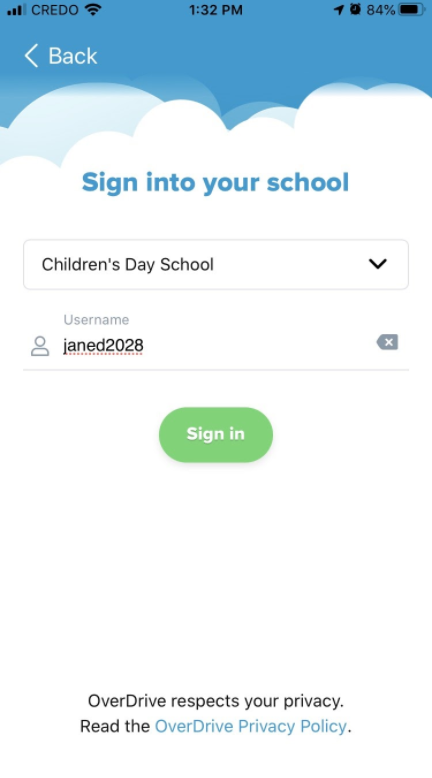
3. Select Children’s Day School from dropdown menu
4. Login Information: Type in your username. No password required.
Username = [student first name][last name initial][graduation year from CDS], i.e. Student: Jane Doe | Kindergarten (2028) | Username: janed2028
Notes:
Middle School Students: your username is the same as your email address + graduation year.
Need help? If you’re having trouble logging in, email All School Librarian Cristal Fiel at .
Explore the collection:
Check out a book. Gain badges the more you read.
ADDING SFPL OVERDRIVE CONTENT TO SORA:
Click on the menu icon at the top right
Click add a public library
Search for San Francisco Public Library
Click on SF to automatically access SFPL Overdrive content
CHECKING OUT BOOKS FROM SFPL:
To check out a book from SFPL, sign in to your SFPL account at checkout.
Use your SFPL Scholar Card information to sign in. If you need this, contact All School Librarian Cristal Fiel at .
If you have changed your pin since receiving your Scholar Card and you can’t remember it, contact SFPL staff to reset it.
Once signed-in you can automatically check out the book or place a hold.
Login with your CDS username and password. Example: If your email is , your username is: samd2022) If you get a message about installing OneLogin Chrome extension, click SKIP.
You should see CANVAS within your account. If you do not see Canvas, click CDS APPS: EVERYTHING and you should see Canvas.
ON IPAD:
Tap FIND MY SCHOOL
Search for: CDS
Tap CHILDREN’S DAY SCHOOL (CDS) TEACHER/STUDENT
Login with your CDS username and password. Example: If your email is , your username is: samd2022)
The above link is a video on how to navigate Canvas. In your Navigation or one of your other classes may be reviewing this video and how to access Canvas with you as well.
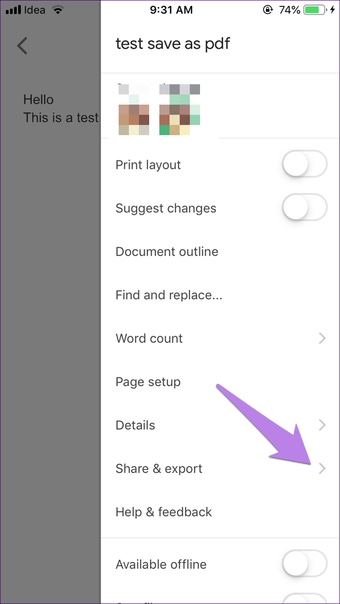
How to change a Google Doc to a PDF to submit on Canvas
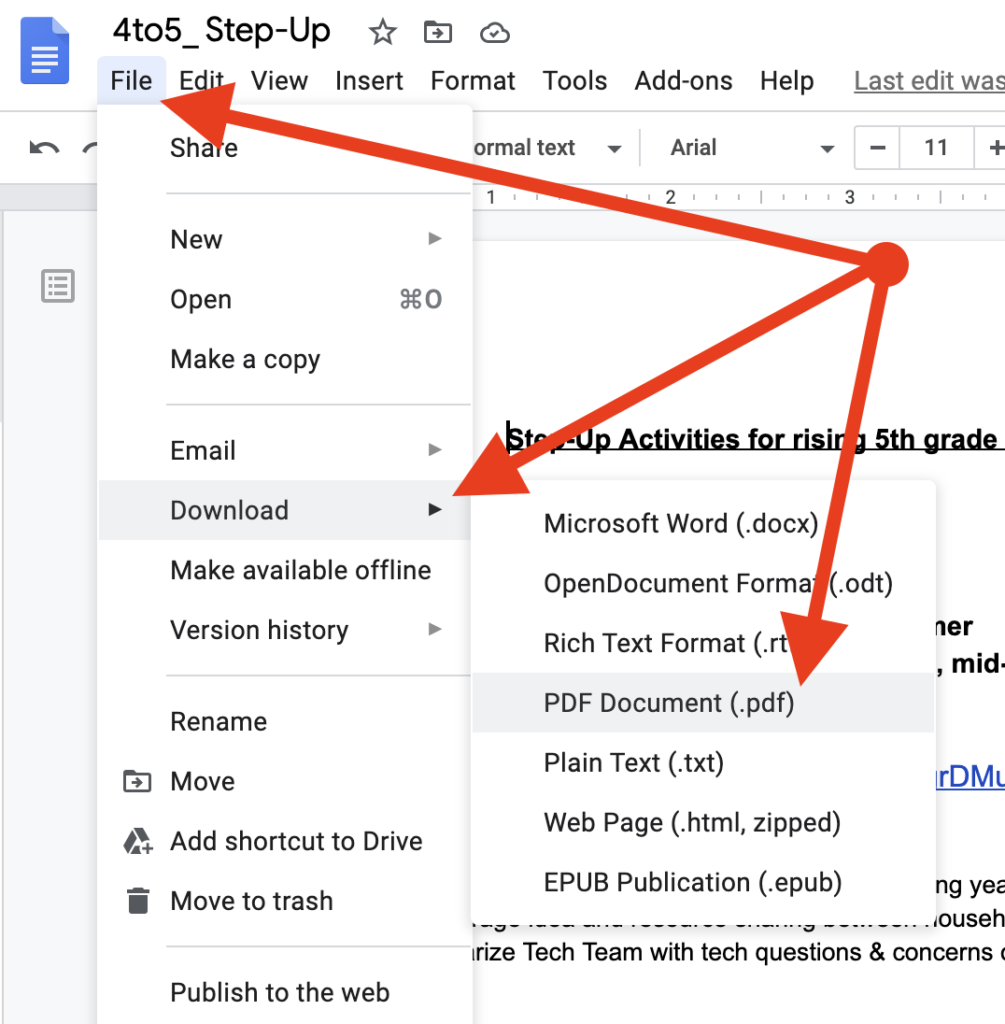
On Computers/Chromebooks
Open the Google Doc
Click FILE
Click DOWNLOAD
Click PDF It will download to your downloads folder or other designated area on your device.
On iPads
Here is a short video on how to do the following instructions for iPad.
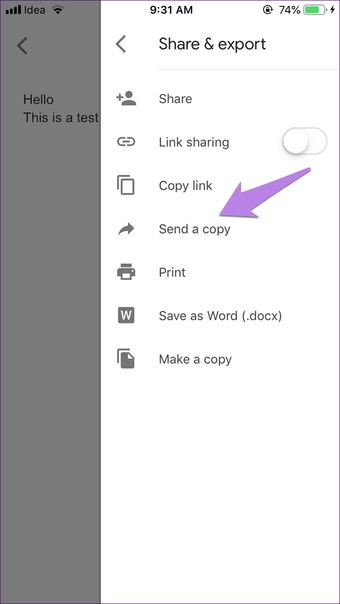
1) Open your Google Doc 2) Tap the triple dot symbol (more button) in the upper left corner 3) Tap SHARE & EXPORT
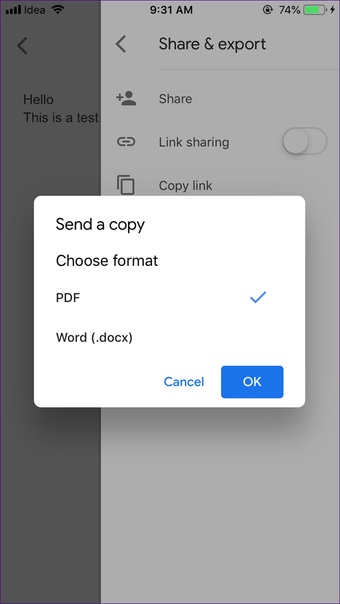
4) Tap SEND A COPY
5) Tap PDF and tap OK
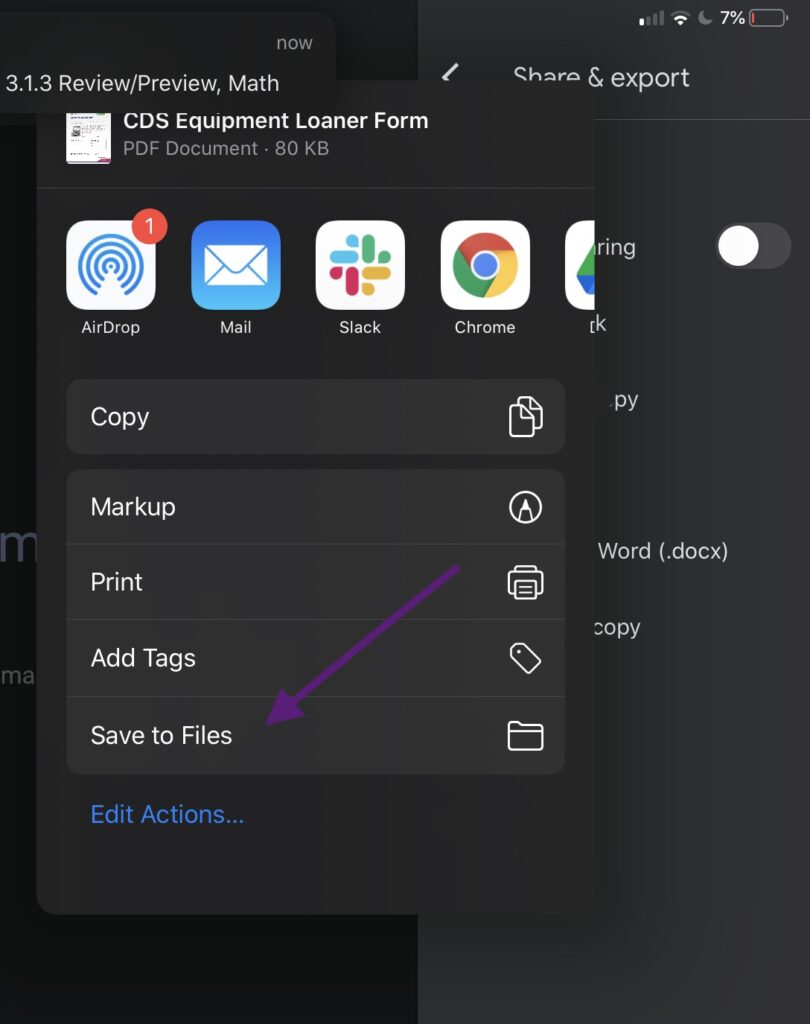
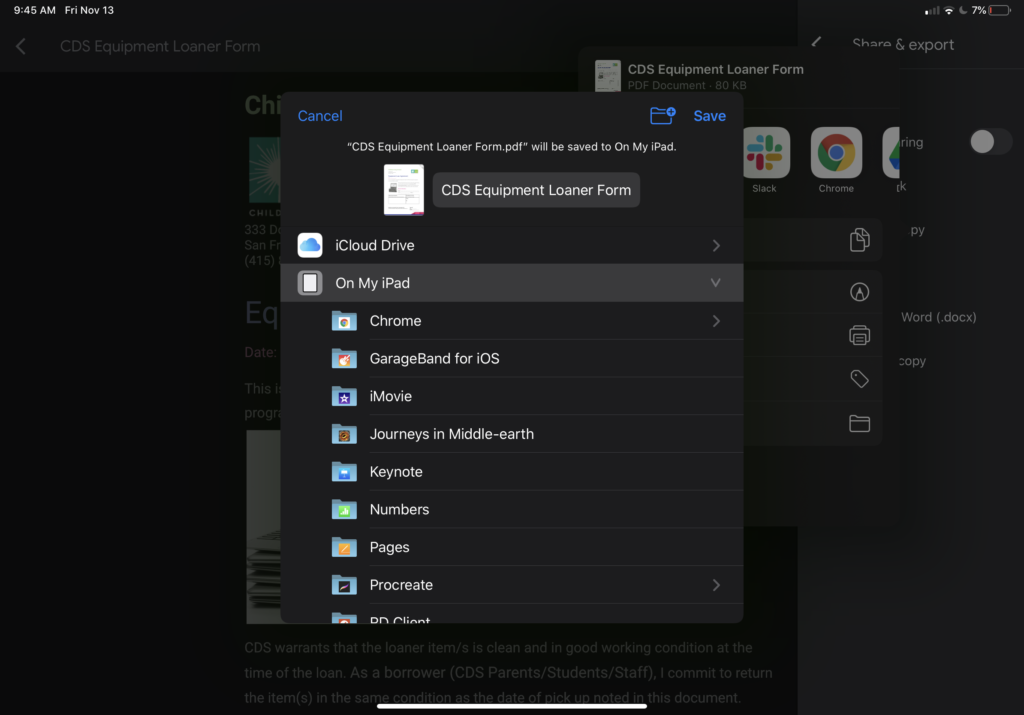
6) Tap SAVE TO FILES
7) Tap to select ON MY IPAD
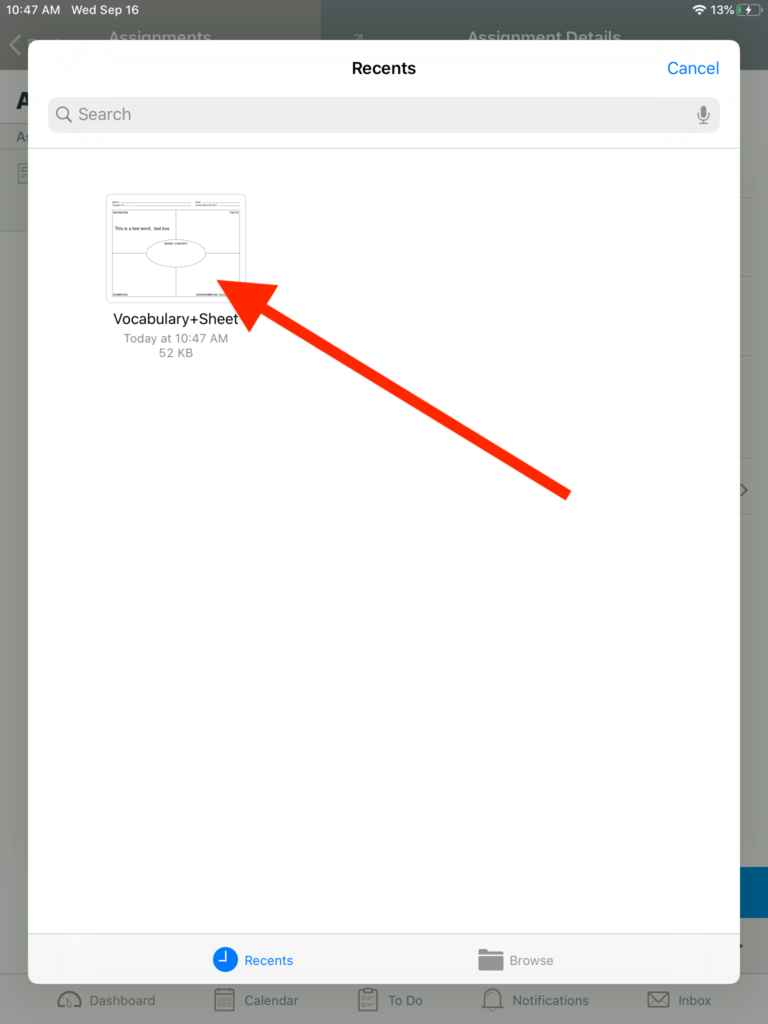
It will save in FILES (looks like a folder).
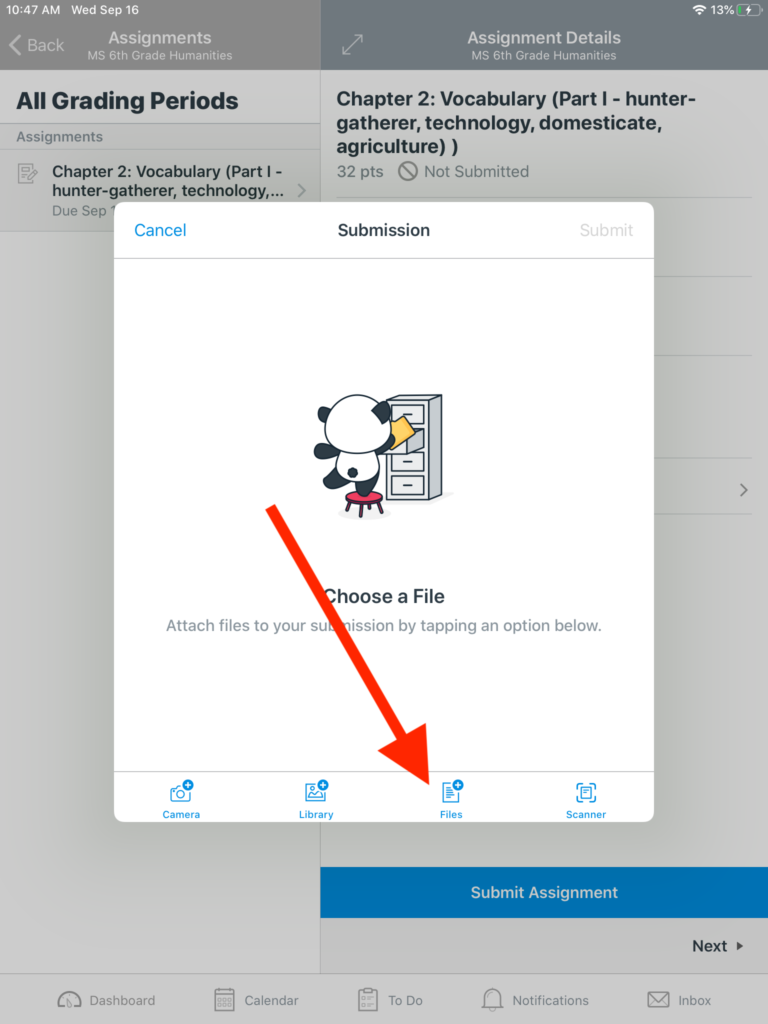
From there you can go open Canvas, upload the assignment. 1) Tap SUBMIT ASSIGNMENT 2) Tap FILES 3) Tap LOCATIONS on the LEFT 4) Tap ON MY IPAD 5) You should see your PDF document. Tap it and then tap SUBMIT to turn it in.
How to MARKUP (add text) to a PDF your teacher has uploaded for you
On iPad:
You will need to download it and use MARKUP to type on the sheet:
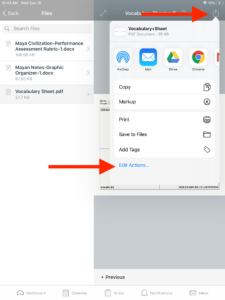
Go to the PDF document in Canvas.
Click the SEND TO button in the upper right corner
If MARKUP is there, click MARKUP.
If “MARKUP” is not there:
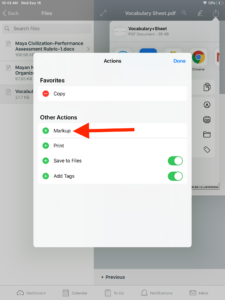
Click EDIT ACTIONS
Click/tap the PLUS symbol next to MARKUP
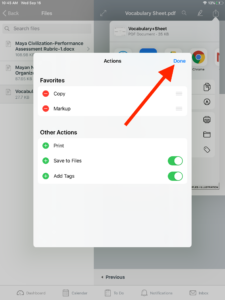
Click DONE.
Then you should see MARKUP in the list. Tap MARKUP.
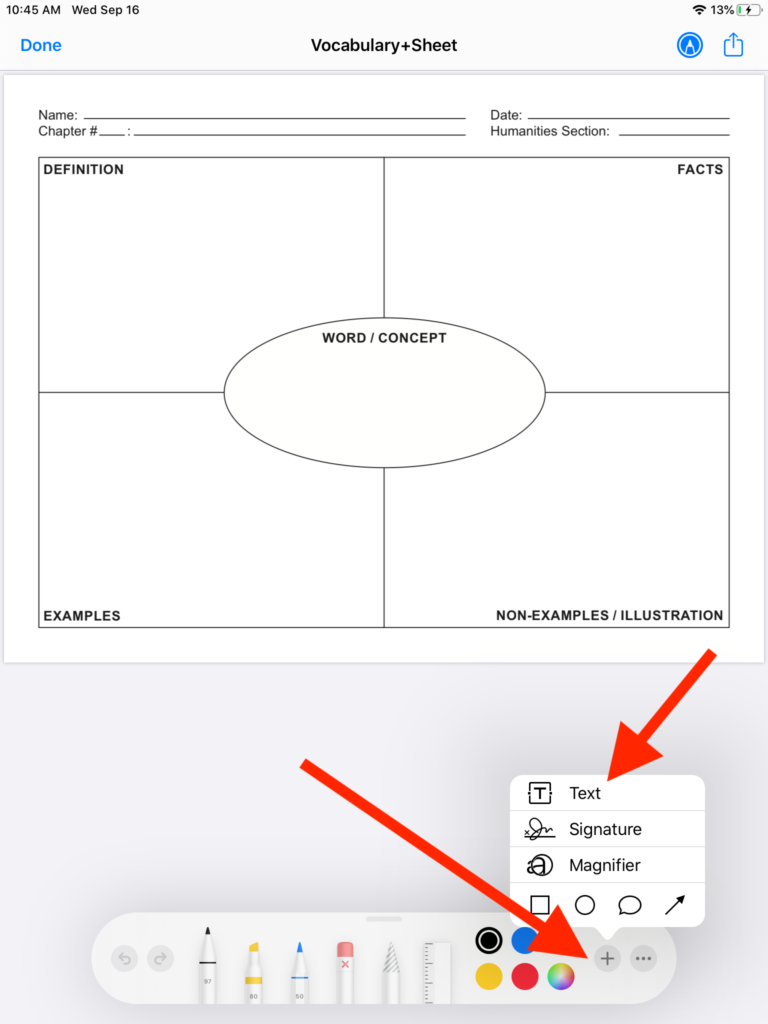
Once you are in MARKUP, click/tap the + plus symbol and select TEXT to put in a text box. You can continue to add all the text boxes you need to fill in your worksheet.
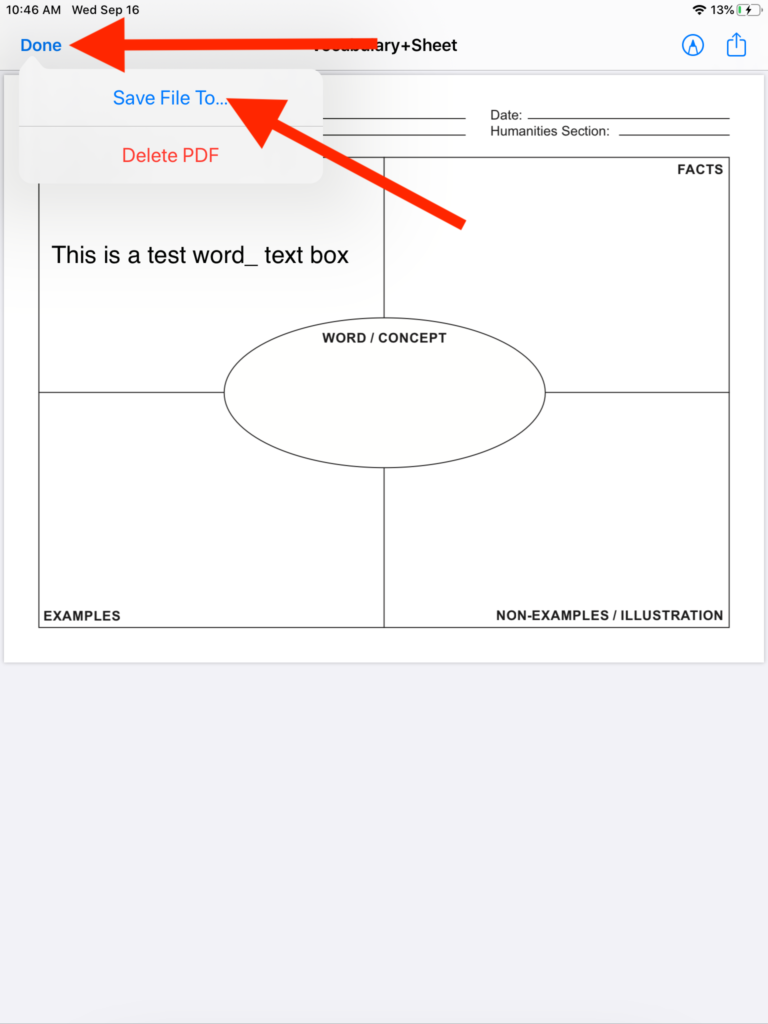
When you are done, click DONE in the upper left corner.
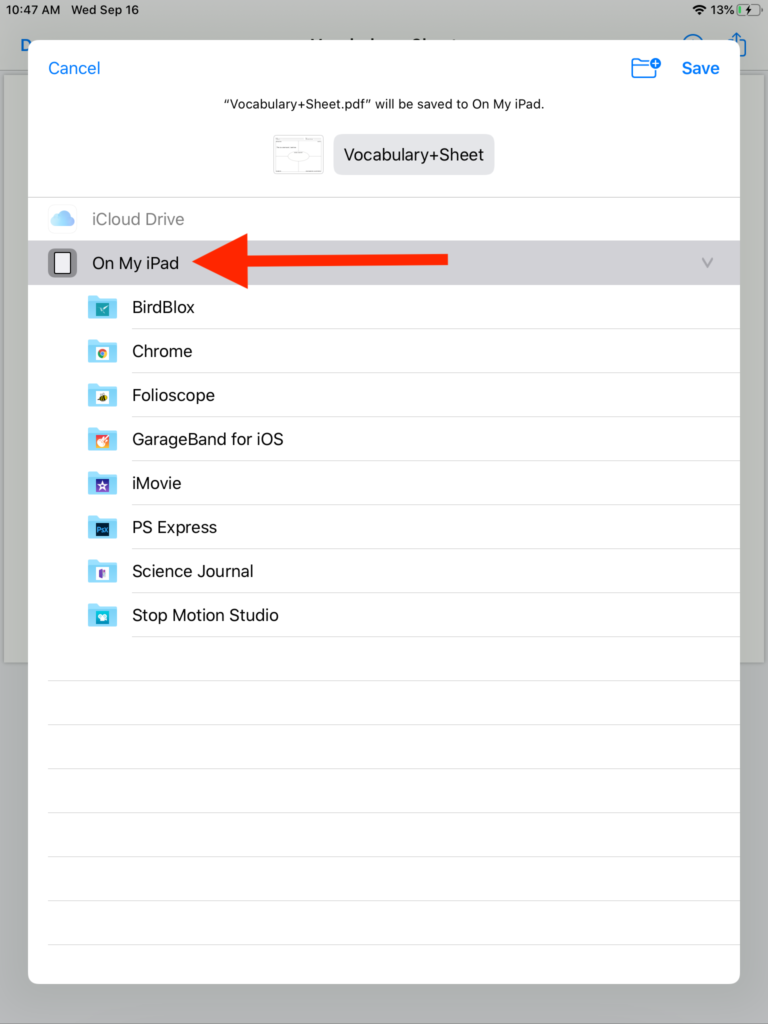
Tap SAVE FILE TO
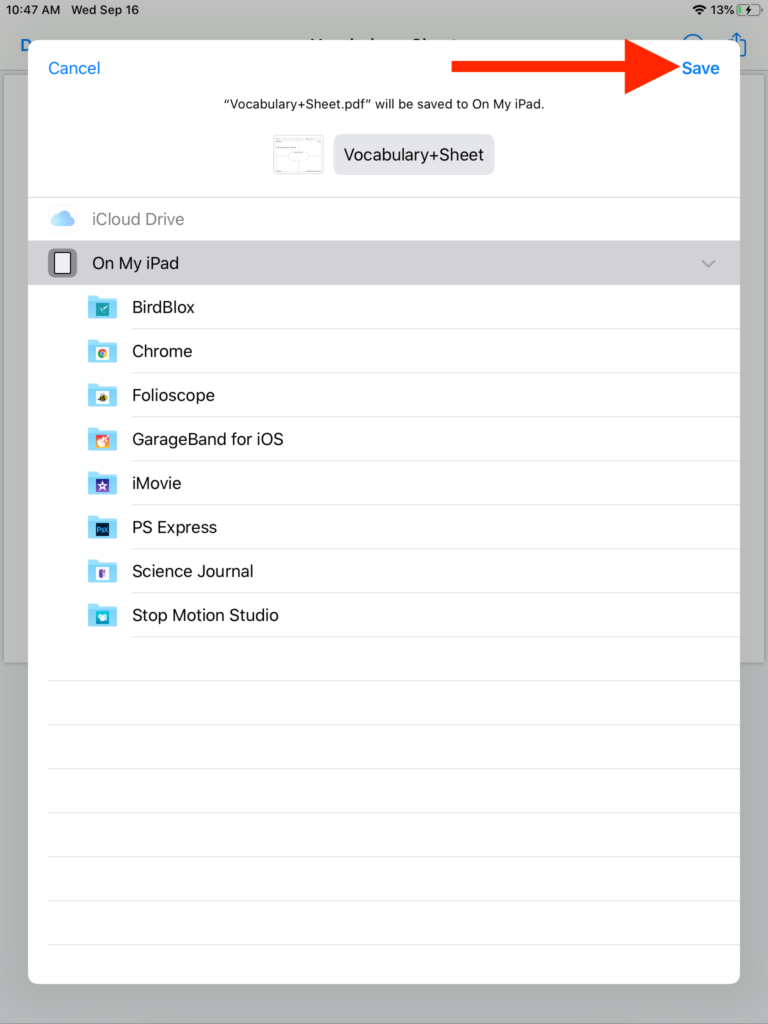
Tap ON MY IPAD
Tap SAVE.
Now to turn your assignment in!
Go back to CANVAS app and go to the assignment.
Click/tap SUBMIT ASSIGNMENT button
Tap/Click FILES
Tap/Click your file you want to upload.
Tap/Click SUBMIT
On Computer:
Download the PDF and open in PREVIEW app.
Click the MARKUP button at the top.
Use the tools at the top to fill in the PDF like the Text Box tool.
3) If you printed it and filled it out by hand, scan the file if you are able to, otherwise take a picture and upload it.
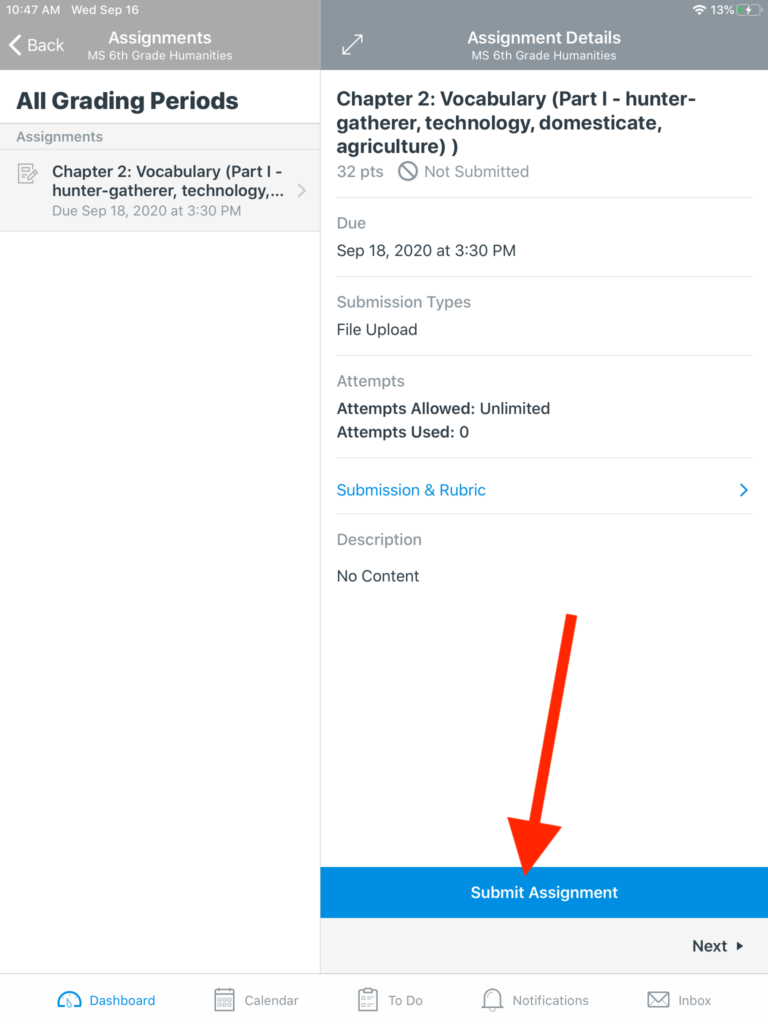
Click/Tap SUBMIT ASSIGNMENT
Tap the SCANNER button
Use your iPad camera to “scan”/take a picture of the sheet.
Tap SUBMIT.
Open Assignments
In Course Navigation, click the Assignments link.
Open Assignment
Click the name of the assignment.
Submit Assignment
Click the Submit Assignment button.
Add Image in Text Entry
To embed an image as part of a text entry assignment, click the Text Entry tab.
Open Embed Image Button
Click the Embed Image button to insert a picture.
Choose Image Source
To embed a photo from the internet, click the URL tab [1]. To embed a photo that is already uploaded in your personal files in Canvas, click the Canvas tab [2]. To embed an image from Flickr, click the Flickr tab [3].
Update Assignment
Click the Update button.
Add Image in File Upload
If you can add an image as your entire submission, click the Choose File button in the File Upload tab.
Note: Your instructor may restrict the types of file uploads that are allowed.
Select Image
Locate and select the image you want to upload on your computer [1]. Click the Open button [2].
Confirm Image Submission
Confirm your image upload file [1]. You can add additional files by clicking the Add Another File link [2].
Submit Assignment
When you are finished, click the Submit Assignment button to submit your assignment.
View Submitted Assignment
You can view your submitted assignment by clicking the Submission Details [1] or the Download [2] links.
Enable uploading Google Drive files in Canvas
Locate your assignment and click SUBMIT ASSIGNMENT
Select FILE UPLOAD
Tap FILES
Tap BROWSE (upper left)
Tap GOOGLE DRIVE on the left
Find or search your Google Doc and tap it
Tap SUBMIT
View Feedback on Submitted Assignments
After turning in an assignment, a teacher can enter a grade or points AND send you feedback.
A student will get an email from Canvas when they receive feedback:
WAYS TO GET TO YOUR ASSIGNMENT FEEDBACK
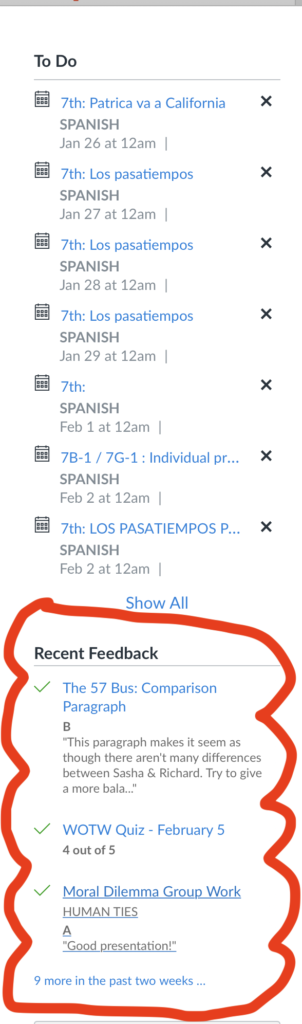
Feedback is listed on the RIGHT side of the assignment in Canvas.
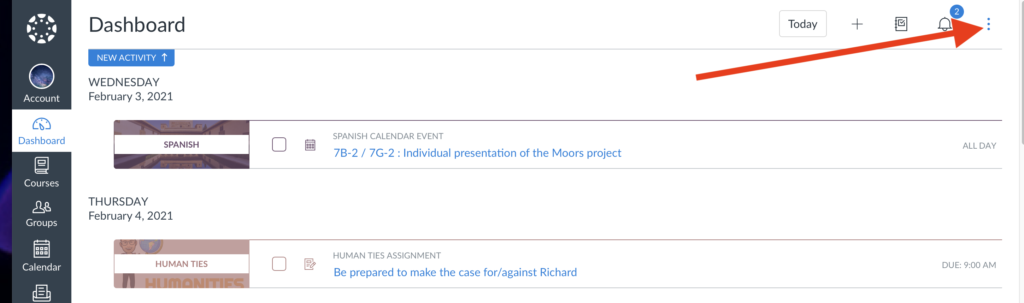
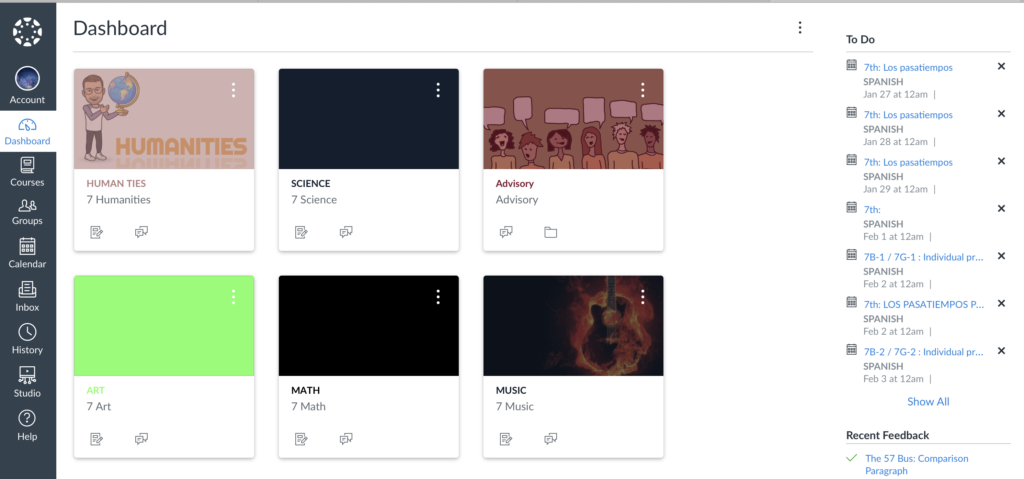
On the Dashboard in Canvas using CARD or RECENT ACTIVITY views OR
Click the link in the email to get to the assignment directly OR
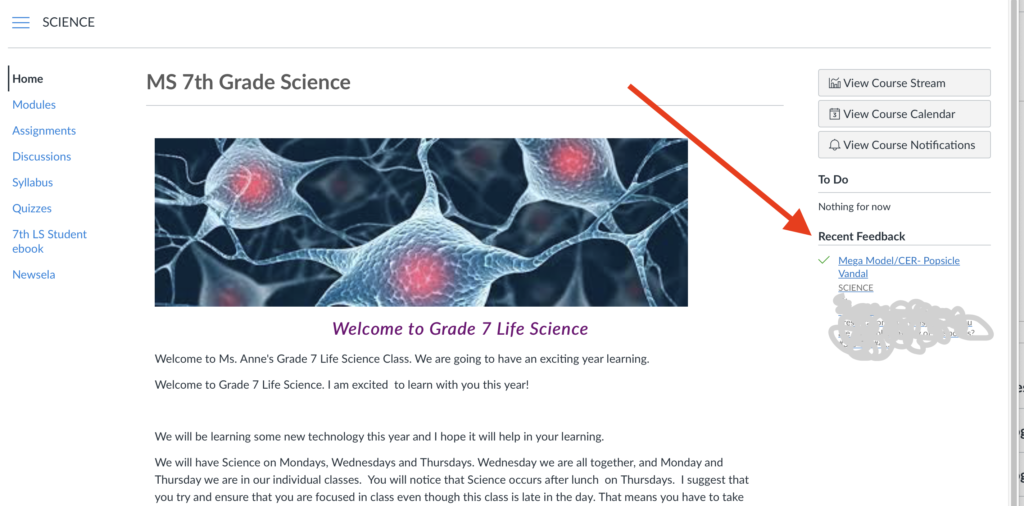
Go to the HOME page of your class and on the LEFT side you will see recent feedback.
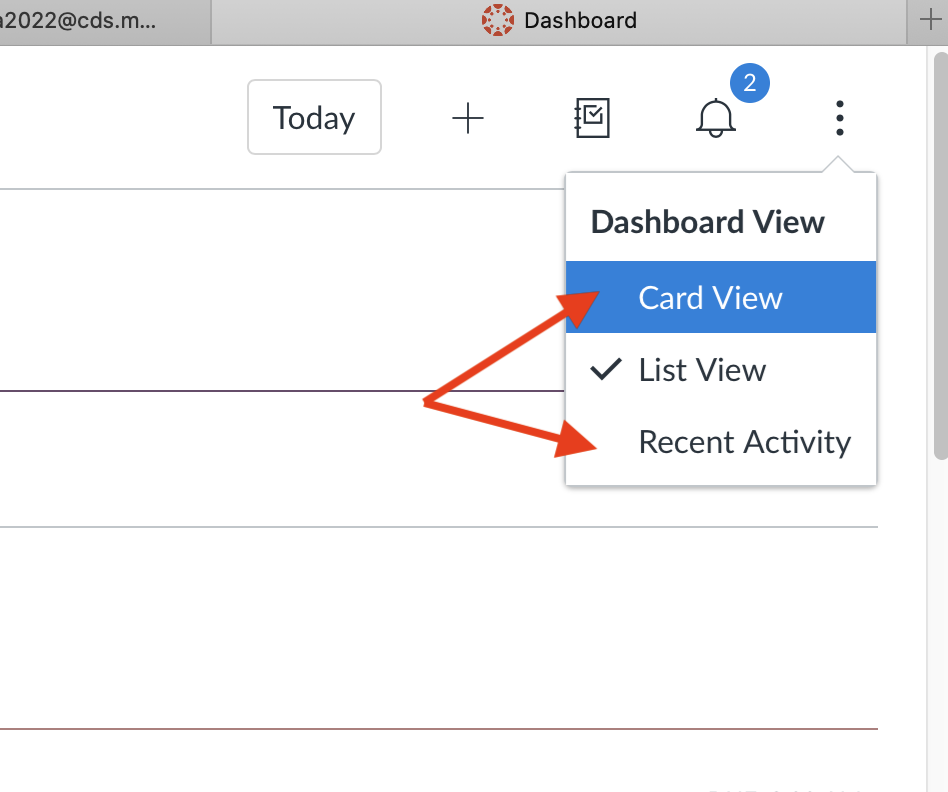
Change Dashboard View
Each Dashboard view has it’s advantages and disadvantages and is useful to switch between them from time to time.
Click the MORE [triple dot] icon in the upper right and select the other views.
Card View is nice for seeing all your classes listed AND seeing recent grades/feedback from your teachers and TO DO items on the right side
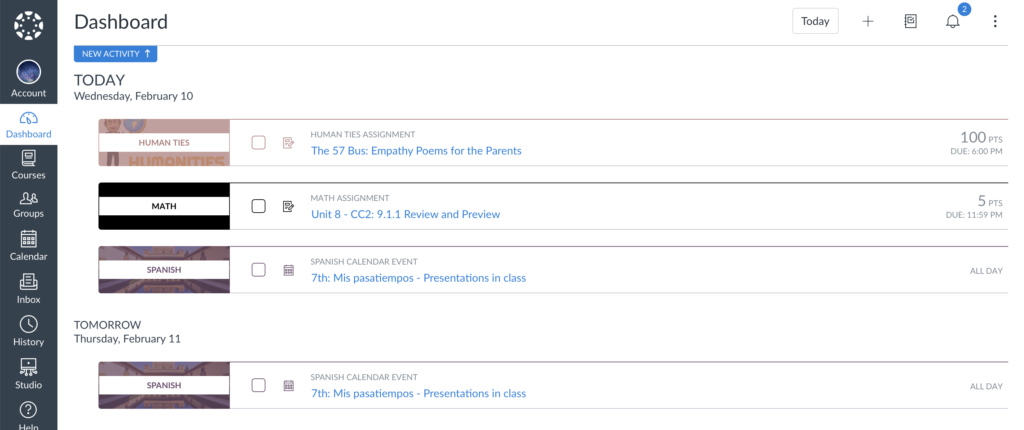
List View is great to see what assignments and to-do items are coming up by order of date.
Uploading your Google Docs on an iPad
Locate your assignment and click SUBMIT ASSIGNMENT
UPLOADING FROM IPAD TO GOOGLE DRIVE:
If you are uploading music up to Google Drive:
In the “My Songs” browser, tap and hold the song you want to share, tap Share, then tap Song. You can add the artist, composer, and title information, choose the audio quality, and an image for the audio file.
Tap Share (upper right corner)Select Google Drive, select your CDS Gmail accountTap SELECT FOLDER and select where you want to save itClick SAVE HEREClick UPLOAD.It will save the music file as a .m4a file (a file format that is similar to MP3 and can be played in Chrome, Google Drive app, etc).
EXPORTING FROM LAPTOP TO GOOGLE DRIVE:
Click on SHARE in the menu bar at the topClick EXPORT SONG TO DISC
Name your file
…so it makes sense to your teacher, like “Jane Doe Composition Assignment 2”
Select where to save it
Saving to your DESKTOP might make it easy to find…
Select MP3For QUALITY, select High or Very HighClick EXPORT
Import your file to Google Drive:
Open your browser (like Chrome) and go to Google Drive (https://drive.google.com)Click the PLUS symbol (upper left)Click UPLOAD FILEFind & select your .mp3 file and click OPEN
That’s it!
You have uploaded it to Google Drive. Now you can add it into Google Classroom or share with your classmates and teachers from Google Drive.
Note: For assignments, please follow your teacher’s instructions.
SHARING GARAGEBAND FILE FROM ONE COMPUTER TO ANOTHER
Locate your .Band File (maybe in your Music or Documents folders, or Desktop.
Right-Click (or CTRL+click) the file and select COMPRESS from the dropdown menu.
It will save a .ZIP file of your GarageBand file. What this does is bring all the hidden files into the file with the GarageBand file together so when you send it, the other person or other computer will have ALL the parts of the song you are working on.
Once it finishes, upload the .ZIP file to Google Drive and share to the other person or download to the other computer.
For the other person or other computer, once you download the .ZIP file, double-click it to open the compressed file and it will open to a .BAND file.
Open this file in GarageBand.
Microphone not recording your voice in GarageBand on your laptop?
First save and quit GarageBand.
Click the Apple logo in the upper left corner and select SYSTEM PREFERENCES.
Click SECURITY AND PRIVACY.
Click the PRIVACY tab.
On the left side, click Microphone.
On the right side, you should see GarageBand listed.
Check the box next to GarageBand.
Close the System Preferences window.
Open GarageBand, and it should allow the microphone to record now.
Not kidding! Restarting your laptop, iPad, or other device resolves maybe 90% of issues.
Mac OS: Click the Apple Symbol (upper-right) and select restart.
iPad: Press and hold the Power button, when the message comes up, slide the power icon on the screen to turn the iPad off. Wait about 20 seconds, then press the power button to turn the iPad back on.
Windows: Click your Windows START button (keyboard or at the bottom-right of your screen), go to the power symbol (if applicable), and click RESTART.
Android: Press and hold the power button and follow the on-screen directions to turn it off. Wait about 20 seconds, then press the power button to turn back on.
Hard Reset Your Device
Sometimes, your device is frozen, or a normal restart is not working or not resolving the issue. Try hard resetting your device.
Mac OS or Windows: Press and hold the power button for about 10-20 seconds. Once the computer turns off, wait about 15-20 seconds, then press the power button to turn it back on.
iPad: Press and hold the HOME button and Power button for 15-20 seconds til the Apple symbol shows up on the screen.
Android: Press and hold the Volume and Power buttons until your device restarts, and you see something on the screen.
Update Chrome or other browsers
If something is not loading in your browser, you may need to update your browser.
Chrome: Click CHROME in the menu bar and go to ABOUT CHROME or go to: chrome://settings/help. It should auto-update. If it does not and gives you an error, go to the Download Chrome website and download & install and use that version of Chrome.
Also, you can try a different browser like Safari or Internet Explorer if you are having trouble using Chrome.
Keep Zoom up-to-date!
Even after a restart, Zoom not working right? Reinstall Zoom. Quit Zoom first then open SELF SERVICE app and click REINSTALL under the Zoom app. Once it reinstalls, try Zoom again!
Laptop Tips
You can enable Dark or Light mode on your CDS laptop. System Preferences > General > Appearance
Organize Your Desktop With Stacks To use the Stacks feature, right-click on a file or the desktop and select Use Stacks from the drop-down menu. Essentially, screenshots will be grouped with screenshots, photos with photos, and PDFs with PDFs, etc. You can also arrange Stacks using keyword tags.
Taking Better Screenshots Launch the Screenshot tool by going to Launchpad (F4) > Other > Screenshot. While many of the screenshot hotkeys familiar to Mac users still work the same, using Shift + Command + 5 will now activate the tool.
iPad Tips
Missing an app on your iPad, open the SELF SERVICE app and click INSTALL for the app you need! If you don’t see it there either, email Alyce!
Quit apps when you are done! If you have ALL the apps open, you will run out of power fast! Double tap the HOME button and then SWIPE UP on the apps to close them!
With technology tools getting better everyday, so are the tools for accessibility for those who have learning differences.
HOW TO TURN ON iOS/iPAD TEXT READER Students will need to go to SETTINGS > ACCESSIBILITY > SPOKEN CONTENT > Turn on all the following: SPEAK SELECTION, SPEAK SCREEN, SPEECH CONTROLLER and I would also suggest turning on HIGHLIGHT CONTENT to help follow allow.
The students can select/download other voices if they do not like “Victoria” which I think is the default voice.